Clean as you code approach — SonarQube Analysis
What is “clean as you code” approach?

Web architect cum developer working in the .NET ecosystem with Azure and having completed many successful projects and products mainly Syncfusion Data Platform - Bold BI and Bold Reports.
Skilled in Full stack web development involving ASP.Net Core MVC, Web API, SQL, jQuery, Scss, Webhooks, Azure, DevOps, TDD, and Agile development.
Implemented a robust and flexible permission management system for an enterprise server application which is the base for Syncfusion's Data Platform - boldbi.com and Syncfusion Report Platform - boldreports.com
What is “clean as you code” approach?
Clean as you code is an approach to code quality that eliminates many of the challenges that come with traditional approaches. As a developer, you focus on maintaining high standards and taking responsibility specifically in the new code you’re working on. SonarQube gives you the tools to set high standards and take pride in knowing that your code meets those standards.
This approach lets you focus on whether the new code you write is clean and safe and you take responsibility only for the code you write. This approach also lets the reviewer see only the analysis of the new code and not the code that was written before introducing SonarQube analysis.
Prerequisite
For you to follow this approach, the project in the SonarQube server should know the analysis report of the branch or a particular code version or a specific analysis or code version with a floating period which will be used for comparison.
Setting your new code definition is explained here — https://docs.sonarqube.org/latest/project-administration/defining-new-code
So, the prerequisite is an analysis report to which the changed code in PR’s analysis report can be compared.
Branch(main/master) analysis for a new project in SonarQube
When a new project is added in SonarQube for your source code, the analysis would be empty, and you must feed the base analysis report (Overall Code) which you decide to go with.
This is a step that should be done before any PR pipeline with SonarQube analysis is created.
For this documentation purpose, the default branch is analyzed and fed into the SonarQube server.
This base analysis can be done in two ways,
From the DevOps pipeline
Using the dotnet-sonarscanner tool — https://www.nuget.org/packages/dotnet-sonarscanner
This is a one-time step based on your new code definition.
The usual setup for SonarQube analysis would be in the PR build pipeline which would do the following,
Pull the source (task) branch
Prepare the SonarQube analysis
Build the source code
Run the SonarQube Analysis
Publish the Analysis to the SonarQube server in the PR’s name
The same pipeline would be triggered after the PR is completed to run the analysis against the destination (main/master) branch. This will update the existing base report (Overall Code) analysis with the latest analysis.
If this is the flow that the project needs, then the recommended approach is to use the dotnet-sonarscanner tool as a one-time step after the project is created.
If your project needs to set the new code definition dynamically or want scan the main branch without setting up the source code in your machine, then running the analysis in the pipeline would be useful.
However, for the first-time setup, if you take the DevOps pipeline approach to feed the base analysis report, then you must override the Quality gate and complete the PR to trigger the analysis on the main branch.
Dotnet tool dotnet-sonarscanner
Using this tool, you can scan any branch in your source code and publish it to the SonarQube server. The tool will detect the git branch name for you and will be pushed along with the analysis.
Once you add the project in SonarQube for your source code repo, you will be shown a page like the one below. Choose the manual approach here,
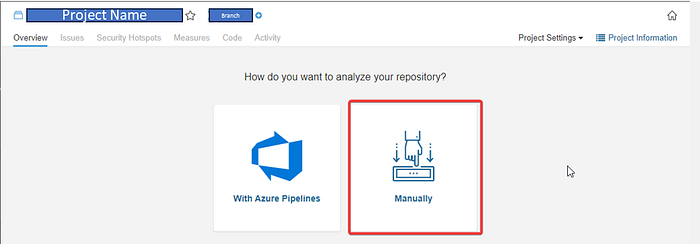
Follow the below steps,
Step 1: Setup your token for analysis
Give the token a name and generate it,
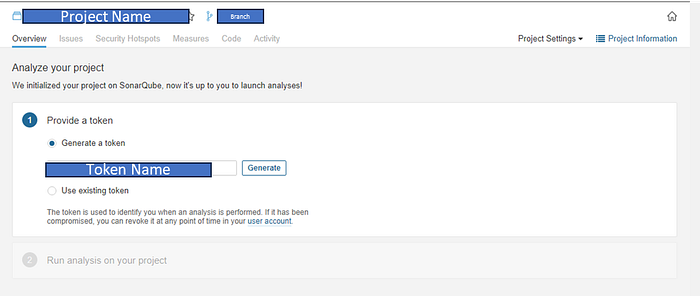
You can always use an existing token if you have one. This is the token you will use in the dotnet tool for authenticating you and publishing the analysis report on your machine.
Step 2: Run the analysis
Prerequisite for this step,
Prerequisite 1
Install the dotnet tool dotnet-sonarscanner using the below command,
dotnet tool install --global dotnet-sonarscanner --version 6.2.0
6.2.0 is the latest version when writing this documentation.
Prerequisite 2
Checkout the source code of the project you are configuring the analysis and make sure you have the branch you want to scan and set as the base report (Overall Code) analysis.
Once the prerequisites are completed, you can execute the scanner on the root of your source code.
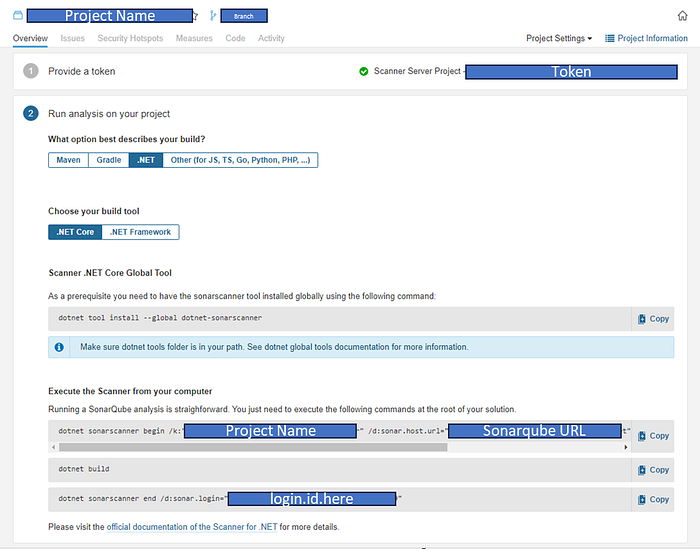
Running a SonarQube analysis is straightforward. You just need to execute the following commands at the root of your solution.
SonarScanner begin command
This command will ensure the tracking of code analysis when you build the project.
dotnet sonarscanner begin /k:"Project.Name" /d:sonar.host.url="https://sonarqubeapp.azurewebsites.net" /d:sonar.login="login.id.here"
Dotnet build command
Now you can build the project with the dotnet build command.
dotnet build
SonarScanner end command
This command will collect the code analysis and publish it to the SonarQube server.
dotnet sonarscanner end /d:sonar.login="login.id.here"
All these commands and instructions are shown in the setup page as like below,
Using the DevOps pipeline for branch analysis
This is the usual step you do in a build pipeline using the SonarQube tasks in the DevOps. Check the below blog on how to do this,
https://blogs.aspnet.in/sonarqube-deployment-integration-and-configuration
Overall Code
Once the branch analysis and publishing are done from the above steps either using the dotnet tool or the DevOps pipeline, you should see the measures in the Overall Code tab as shown below,
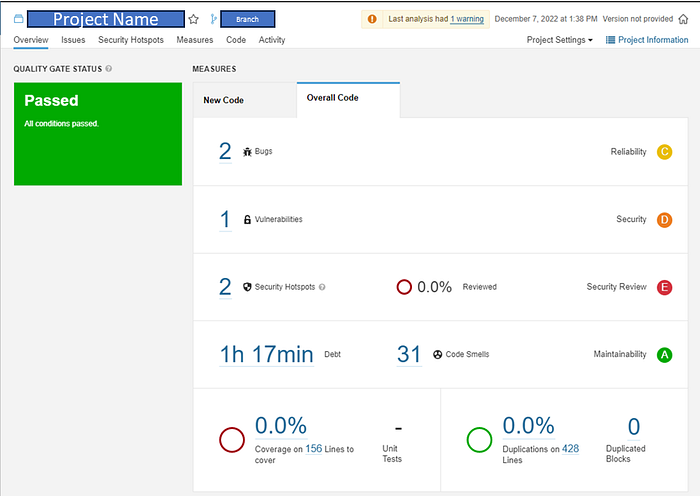
This will be the default base report analysis which will be used for comparison(until the next scan happens on the same branch) when a PR analysis report is published.
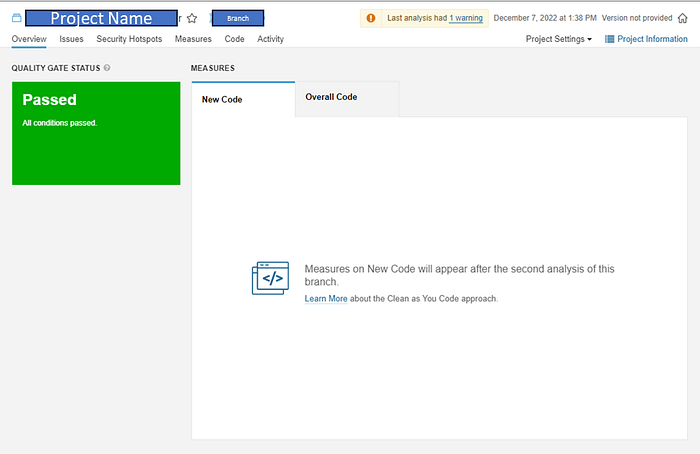
The new code tab will be empty at this point.
PR pipeline analysis report comparison
Now, let's introduce a code smell issue in a task branch and see the analysis report.
In the New Code tab, you will now see the issue that was identified in the PR as shown below. Note that the 33 code smells in the Overall Code are not reported here.

Only the new issues are reported which lets you focus on them and ignore the existing code. This is how we follow the “Clean as you code” approach.